Integrating Azure Active Directory Security Into NancyFx (part I)
Introduction
This is the first in a series of posts focusing on two .Net development technologies: Azure Active Directory (AAD) and NancyFx (aka Nancy). Nancy has emerged as a scalable web-development framework affording what it labels the "Super Duper Happy Path" (SDHP) for simplistic creation of web applications. AAD is a Azure/cloud-hosted directory service supplying authentication as a service (SaaS). We are securing a Nancy web application with AAD; the code presented in this series is available here.
- In Part I: Azure Active Directory Configuration we configure a new AAD tenant for our use
- In Part II: AAD From a Nancy Web Application we take the first steps to integrate a Nancy web application with AAD
- In Part III: Nancy Statless Authentication With AAD we implement Nancy's stateless authentication to leverage AAD
Part I: Azure Active Directory Configuration
This post covers the setup and configuration of a new Azure Active Directory account and tenant to support our use within a new web application.
Authenticating Users

Verifying that a person who wants access to secured resources should be allowed access typically necessitates substantial development effort to support; within the context of a web application:
- First we would create a UI view to support accepting a user id and password.
- Next we might create a database repository holding all authorized user names and passwords against which to verify those credentials.
- Finally our application requires logic to determine whether or not this particular user has required authorization and handle each case accordingly.
...or instead we can offload this work to AAD -- a cloud-hosted directory service which can manage such burdens as a proxy on behalf of our application. Think of AAD as the security officer blocking access to a Customs checkpoint within the international arrival section of an airport. Without valid proof of your identification (passport) as well as authorization to enter the country (ie citizenship, travel visa etc) you will not be permitted entry. In similiar manner AAD can restrict access to our application.

As an added incentive this service is practically free (seriously!).
Configuring an Azure Active Directory Account and Tenant
(Before continuing be sure you have an active Windows Azure account)
In order for AAD to handle authentication for our application we need to create an AAD tenant within which applications and authorized users that access them are configured. An AAD tenant can be conceptualized as an ecosystem containing users and applications that interact. Users within the tenant have access to applications within that tenant; furthermore such applications may be configured to allow interactions between eachother as trusted clients.
An important concept to understand is that in order for a user or application to interact with components of the tenant ecosystem it must first exist within it. Another useful way to conceptualize a tenant as a domain - in fact an AAD tenant is often reffered to as an (Active Directory) domain.
Create a new Active Directory Account & Tenant
- Login to the Windows Azure Management portal.
- Navigate to the "Active Directory" section using the navigation bar.
- Create a new Active Directory account and tenant using the ADD icon.
Within the "Add directory" dialog populate the following:
- DIRECTORY = Create new directory
- NAME = MyOrganization
- DOMAIN NAME = [SOMEAVAILABLENAME].onmicrosoft.com
- COUNTRY OR REGION = [YOUR COUNTRY]
NOTE: AS OF THIS WRITING ACTIVE DIRECTORY ACCOUNTS & TENANTS CANNOT BE DELETED OR RENAMED AFTER CREATION. WHILE THIS IS PLANNED TO CHANGE, IN THE MEANTIME PICK "SOMEAVAILABLENAME" THAT WON'T BOTHER YOUR OCD TOO MUCH.
What do did was create an Active Directory Account (named NAME) containing a tenant (DOMAIN NAME). An AAD Account can house multiple tenants:
Add a User to Your AAD Tenant
One of the benefits of AAD is that it can be synced with an on-premises Active Directory to leverage existing user information. In this tutorial though we will manually create a user within our tenant to use throughout the rest of this blog series.
- Within the "Active Directory" section of the Windows Azure Management portal select the AAD Tenant we created above.
- Navigate to the "USERS" tab and click the ADD USER icon.
- At the "Tell us about this user" prompt populate the following:
- TYPE OF USER = New user in your organization
- USER NAME = Test@YOURTENANTNAME.onmicrosoft.com
- At the "user profile" prompt dialog populate the following:
- FIRST NAME = Testy
- LAST NAME = Testo
- DISPLAY NAME = Lord Testington
- ROLE = Global Administrator
- At the "ADD USER Get temporary password" prompt click the create button.
- Select the newly-created user and overwrite the temporary password with a strong password that is easily rememberable.
Add an Application to Your AAD Tenant
After creating a user within our tenant we also need to configure information about the application we want AAD to provide user authentication for. Here's how:
- Within the "Active Directory" section of the Windows Azure Management portal select the AAD Tenant we created above.
- Navigate to the "APPLICATIONS" tab and click the "ADD" icon.
- Click "Add an application my organization is developing".
- Enter NAME=WebApp and select "WEB APPLICATION AND/OR WEB API" before clicking the ->
- At the "ADD APPLICATION App properties" dialog populate the following:
- APP URL = http://localhost:1234 [the url of your Nancy Web App]
- APP ID URI = https://YOURTENANTNAME.onmicrosoft.com/WebApp
- At the "ADD APPLICATION Directory access" dialog populate the following:
- SINGLE SIGN-ON
- After creation navigate to "CONFIGURE" and modify the Reply URL of the application to be http://localhost:1234/Authenticated this is the url that will be called after a user has been authenticated by AAD. Click the SAVE icon to persist changes.
- At the very bottom of the application's configuration you’ll see a list of the Web APIs provisioned within the same tenant. If you have none, this would be a good opportunity to create one for testing purposes. You can do that by repeating the steps in this block while altering steps 4 & 5 to reference instead "WebAppResource". After creation, specify WebAppResource is a WEB API ACCESSED BY THIS APPLICATION from the WebApp configuration page. Click the SAVE icon to persist changes.
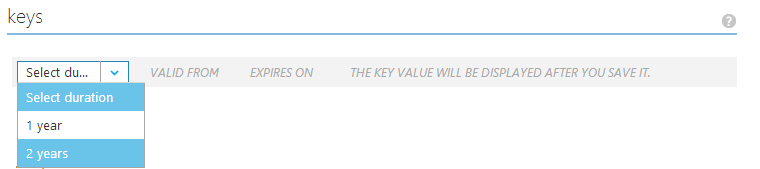
- There's one more piece of information we need to configure for use in part II; we will generate a shared key that our application will use to prove to AAD that it is trusted (by us). You can generate this key within the WebApp tenant configuration inside the "keys" section:
One...
Two...

(click the "SAVE" icon to persist)
Three...
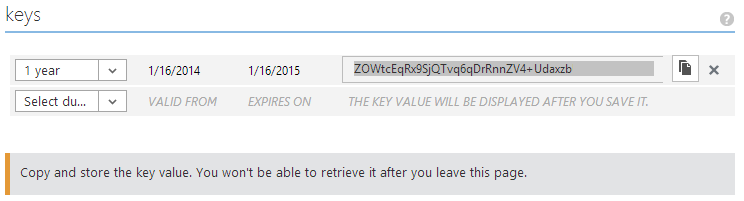
After generation copy and paste the key to a temporary notepad++ document because upon renavigation it will be hidden (but you can generate a new one):

Now you should have two applications configured within your tenant like so:

Conclusion
This post covered the necessary configurations for Azure Active Directory to support authentication on behalf of a web application (that we have yet to create). In the next post, part II, we will create a simplistic NancyFx web application and use AAD to authorize users.